
Recently, I pondered what would happen in case of a black out / internet outage and noticed that I would not even have that much material to read, as books are less and less common, including encyclopedias. Luckily, I discovered the Kiwix project, which I really like. It allows downloading full dumps of all Wikipedia articles in many languages and serve them in the local network. Other wikis/sites are available as well.
As large power banks, laptop batteries and other sources of energy are nowadays available in large quantities, I explored the idea of using a Raspberry Pi as a low power consumption WLAN access point that serves Wikipedia dumps with kiwix-tools.
Currently, I’m using a Raspberry Pi 3 with only 1GB of memory. I inserted a 256GB SD card that can easily contain a dump of the English and German Wikipedia including images.
If you want to set up your own hotspot & Wikipedia server, use the following procedure:
- Download the .zim files you like, for example wikipedia_en_all_maxi_2025-08.zim.
mkdir wikipedia
cd wikipedia
wget https://www.mirrorservice.org/sites/download.kiwix.org/zim/wikipedia/wikipedia_en_all_maxi_2025-08.zim - Install the kiwix-tools package and also dnsmasq:
sudo apt install kiwix-tools dnsmasq tmux - Create a Kiwix Library and add the downloaded ZIM file:
kiwix-manage lib.xml add wikipedia_en_all_maxi_2025-08.zim
You can add additional files, if you like. - To set up a WLAN hotspot with NetworkManager, run
sudo raspi-configand select NetworkManager to manage your network config. - Add a usable domain to the /etc/hosts file, for example wikipedia.local. Replace the IP address with the IP address of your Raspberry Pi. AFAICT NetworkManager will use 10.42.0.1/24:
sudo bash -c 'echo "10.42.0.1 wikipedia.local" >> /etc/hosts' - NetworkManager internally uses dnsmasq as a DNS server when configuring a hotspot. However, it will not use the /etc/hosts file to serve local domain names. Therefore disable the internal dnsmasq by adding the line
dns=nonein the[main]section of the/etc/NetworkManager/NetworkManager.conffile. - Start and enable dnsmasq:
systemctl start dnsmasq.service
systemctl enable dnsmasq.service - Start the hotspot:
nmcli device wifi hotspot ssid wikipedia.local password "YOUR_SECRET"
This command prints a UUID, which you need for additional configuration. You can later always retrieve the UUID withnmcli con show --active. - Optionally: if you want to make the Hotspot available to neighbors, you can disable the WLAN security/password. Additionally, you can (should) disable routing into your private LAN, if the Pi is connected via network cable.
sudo nmmtui-edit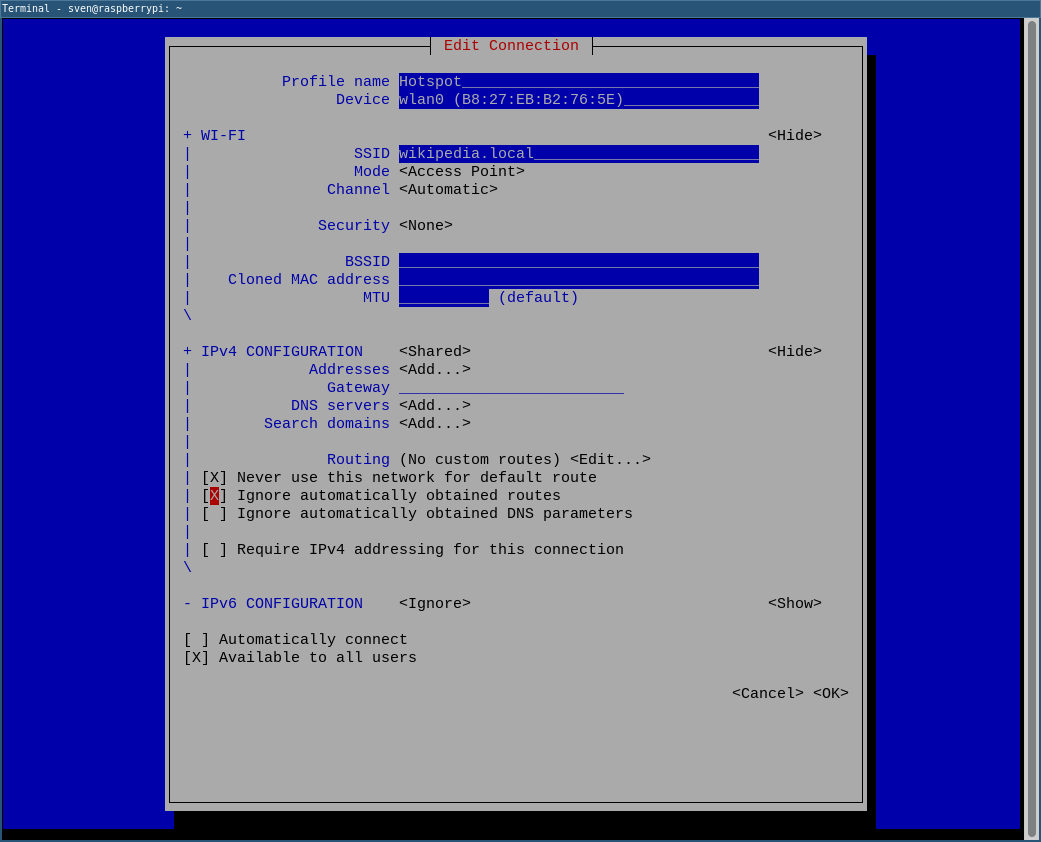
If you want to always start the WLAN network, check the “Automatically connect” option. - Start the hotspot with
nmcli connection up $(nmcli con show --active | grep wifi | awk '{print $2}') - Create a systemd service for Kiwix and start it. Run
sudo nano /etc/systemd/system/kiwix.serviceand add the following content:[Unit]
Description=Kiwix Serve
After=network-online.target
Wants=network-online.target
[Service]
ExecStart=/usr/bin/kiwix-serve --port 80 --library /home/pi/wikipedia/lib.xml
Restart=always
RestartSec=15
[Install]
WantedBy=multi-user.target - Start and enable the service:
systemctl daemon-reload
systemctl start kiwix.service
systemctl enable kiwix.service
You should now be able to connect to the wikipedia.local hotspot and open http://wikipedia.local (not https!) in any device that has a browser (for example smartphone).

Worth noting: kiwix.org sells ready to use hotspots, which probably directly supports the project.