This is an attempt to build a small, lightweight, cheap, diy spectrometer. This was a part of the MINT Girls Regensburg project in 2015 [1]. The spectrometer was designed to work on a Watterott StarterKit Roboter V2 [2]. The robot can connected to a PC via bluetooth. A Python program can be used to remotely control the robot and spectrometer.
All required .stl-files and source code is published under the MIT license on Github [3]. The page about the TSL1402R on Arduino Playground [4] was used as an inspiration.
The spectrometer itself (without Arduino) can be build for less than 40 €.
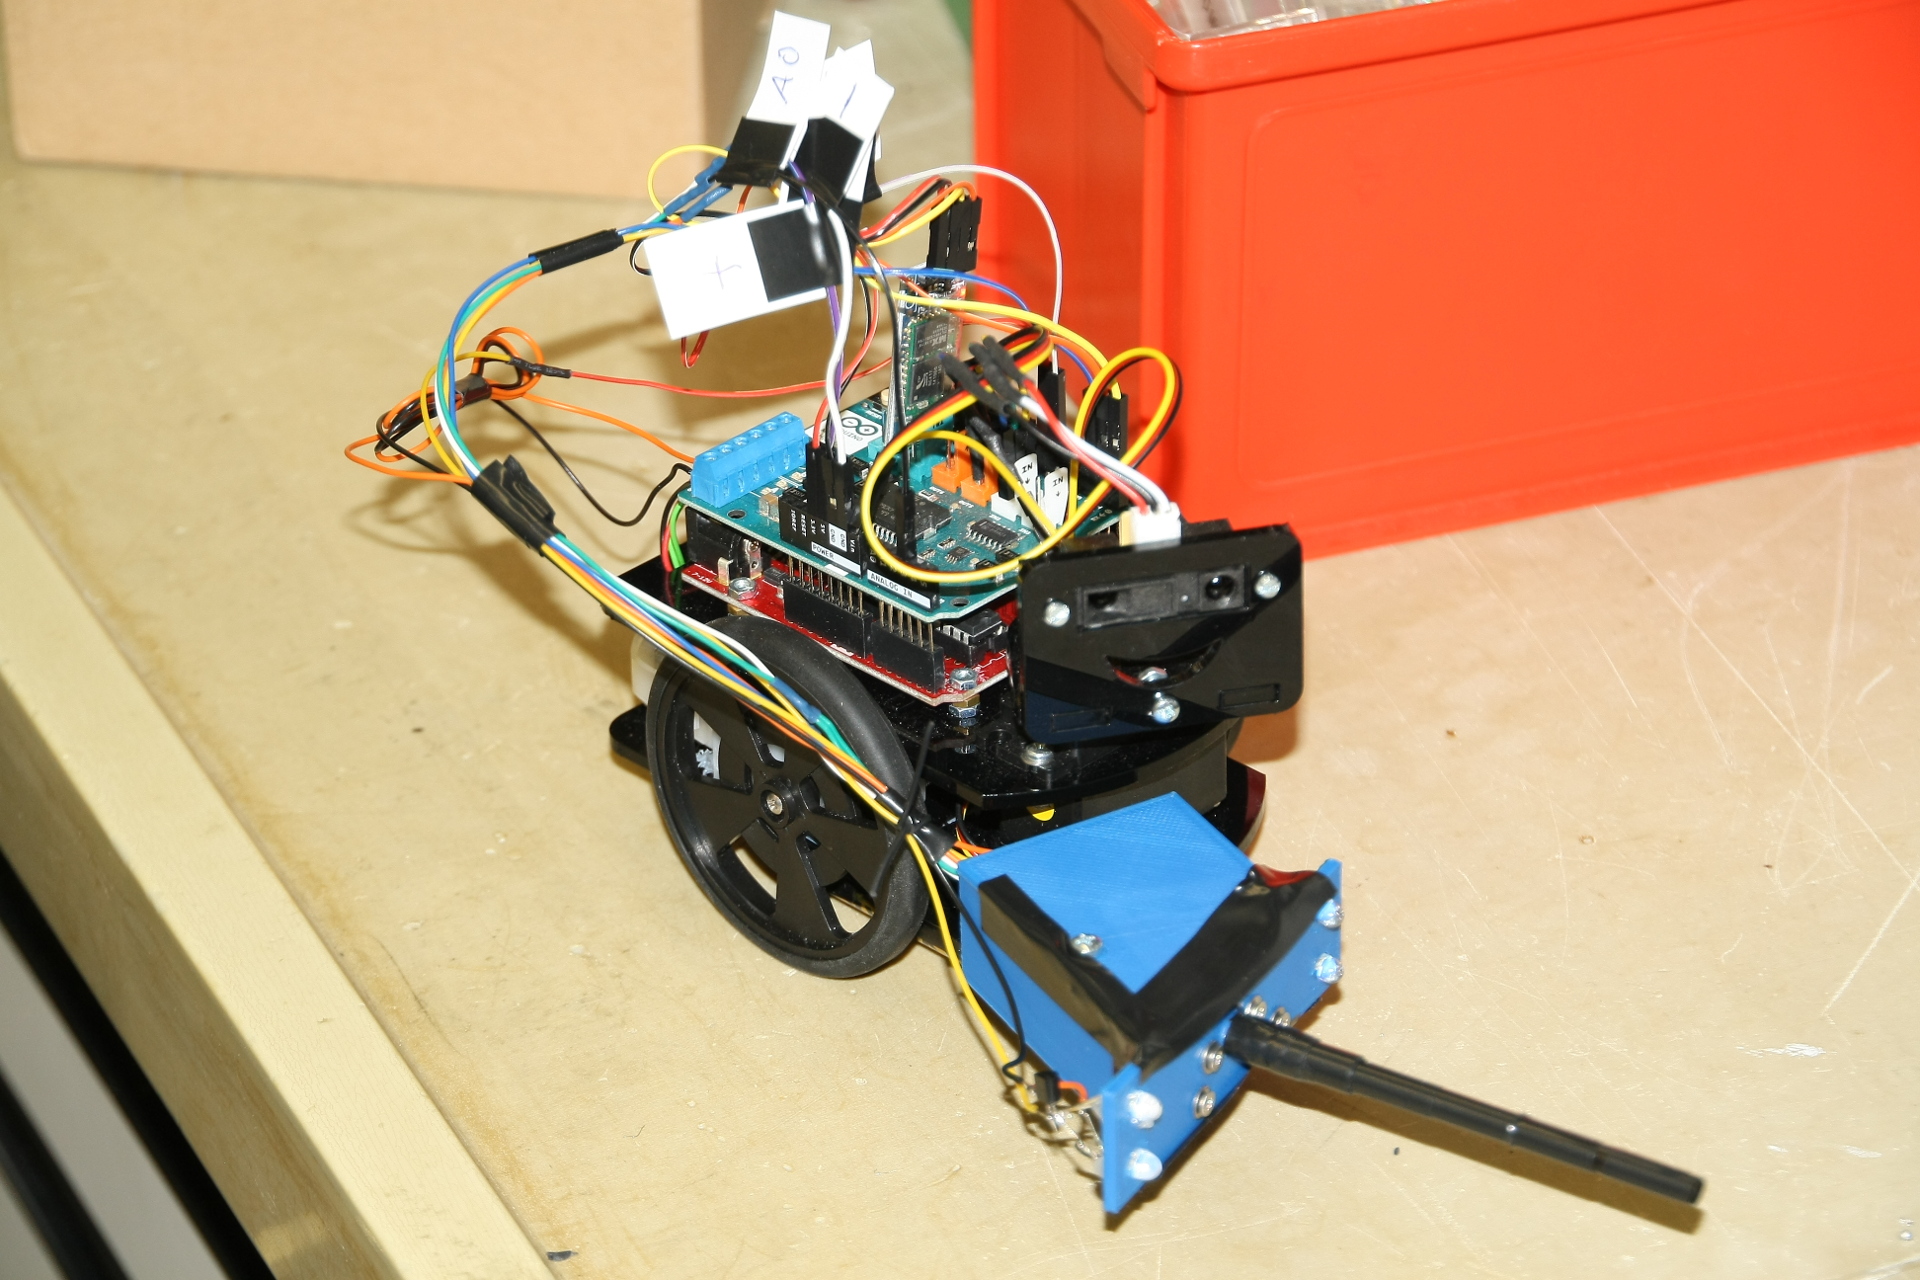
Spectrometer mounted to robot
List of required parts
- 1x Black drinking straw
- black tape
- 3D Printer (e.g. black PLA)
- printable parts (.stl files)
- 4x M2,5 x 5mm screws + nuts
- 4x M2,5 x 10mm screws + nuts
- 2x M4 x 40mm screws + nuts
- 1x TSL1402R
- 4x white LEDs
- 1x perfboard
- wires, pin cables, hit shrink tube, etc
- 1x Arduino
- 1x diffraction grating 1000 lines / mm (cheap source [5])
- 1x 2N7000 MOSFET
Circuits
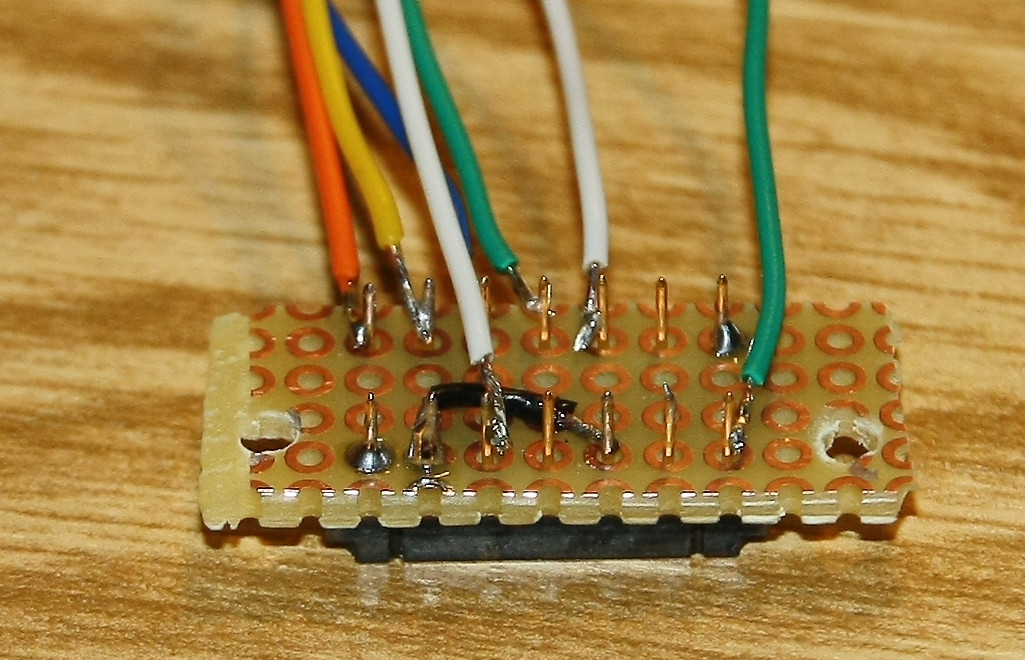
TSL1402R on perfboard
Cut out a 30 x 11 mm piece from the perfboard. Solder the TSL1402R onto it and drill to holes into the corners. The holes should be 25 mm apart. The corners will be used to screw the perfboard onto the angled chip holder.
Solder cables to the TSL1402R like shown in Figure 9 of the datasheet [6] (serial connection). Basically connect pin 13 to 10 and 4 to 8.
Then connect the cables to the arduino.
| Description | Arduino | TSL1402R |
| Supply voltage +5V | +5V Pin | Pin 1 (VDD) |
| Ground | Ground | Pins 5 (GND) and 12 (GND) |
| Signal in | Pin 6 | Pin 2 (SI1) |
| Clock | Pin 2 | Pin 3 (CLK) |
| Analog out | Pin A3 | Pins 4 (AO1) and 8 (AO2) |
The white LEDs can be turned on and off with a 2N7000. Connect Pin 7 of the Arduino with the Gate of the 2N7000. The four (parallel) LEDs can be connected to the same voltage source as the Arduino. Make sure to place a fitting resistor between the source and LEDs.
Case
All required parts for the case can be 3D printed, preferably in black. Additionally you need a (black) drinking straw and (black) tape.
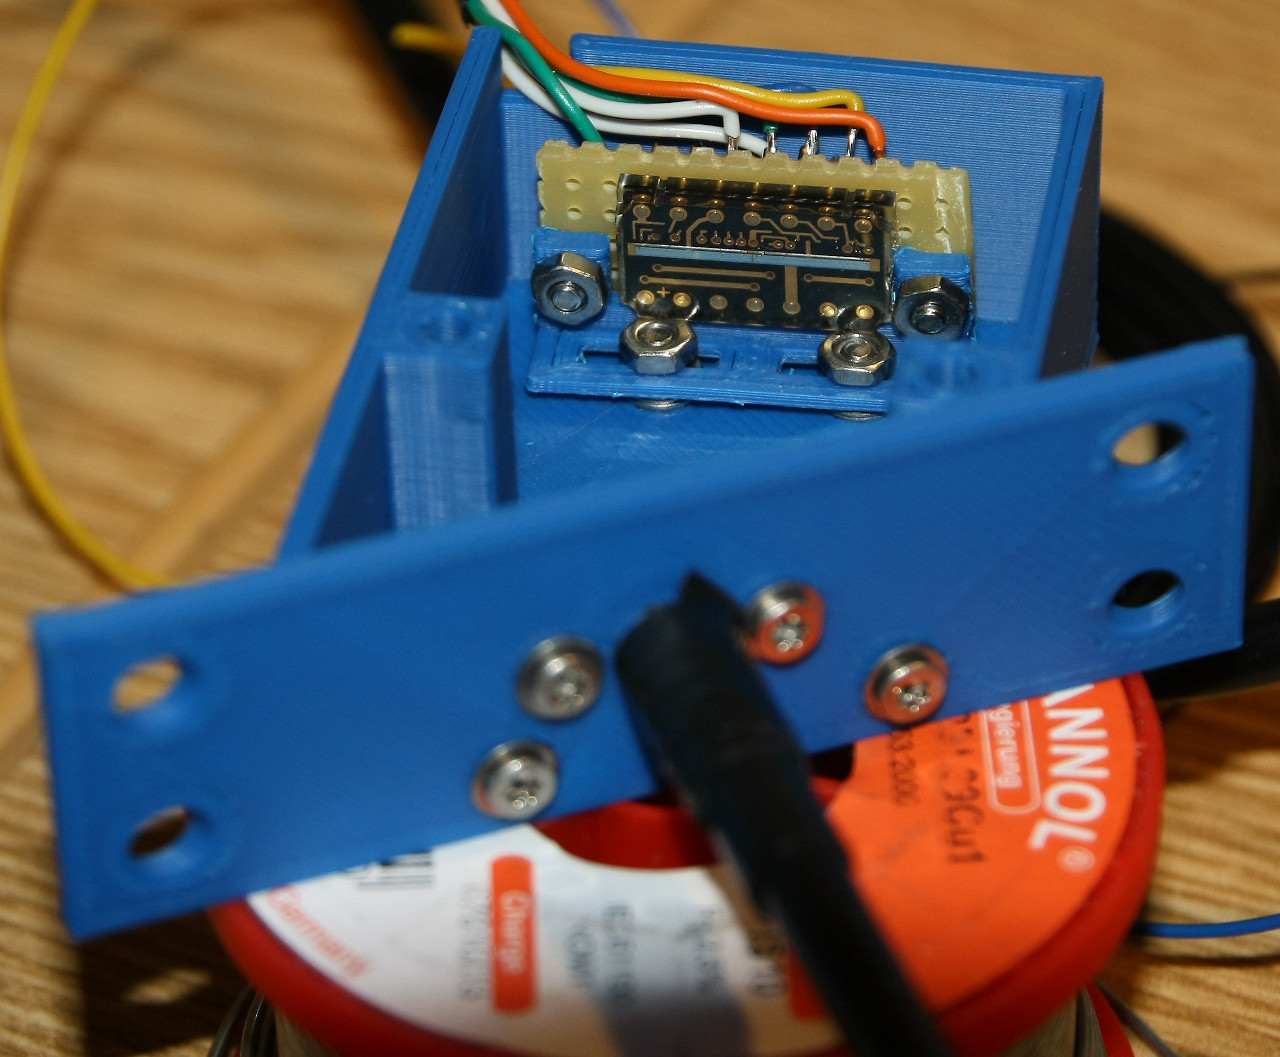
After printing all parts, screw the perfboard onto the chip mount, and fixate the chip mount into the bottom of the case. The position of the chip mount can be adjusted to the left and right.
Cut a small rectangular piece from the optical grating and glue (?) it into the grating mount. One screw holds the grating mount to the front panel, the second screw allows for a few degrees of rotation in order to align the grating to the TSL1402R.
Use the 2 screw holes at the bottom of the front panel to fasten it to the bottom of the case.
Use tape to fix the black drinking straw to the front panel. Make sure that the straw is well aligned with the forward facing opening.
Spectrometer assembly
Additionally you can glue 4 white LEDs into the holes at both sides of the front panel. Make sure that they focus on a point beyond the drinking straw.
Use a bright light source at the end of the straw to align the TSL1402R and the diffraction grating. After you’re finished with the alignment use the two M4 screw to fixate the case cover. Black tape can be used to seal all slits.
Software
Write the RoboterRemoteControl software into your Arduino. If necessary change the pin layout in the configuration section at the beginning of the file.
The Python3 program qtMissionControl can be used to obtain and print simple readouts from the spectrometer. It requires the libraries PyQt4, numpy and matplotlib. The serial port and baudrate have to be set in line 10 and 11 of the source code.
References
[1] http://www.mint-girls-regensburg.de/
[2] http://www.watterott.com/de/StarterKit-Roboter
[3] https://github.com/sven15/arduino-spectrometer
[4] http://playground.arduino.cc/Main/TSL1402R
[5] https://www.3bscientific.de/strichgitter-1000mm-u21874,p_872_1485.html
[6] https://ams.com/jpn/content/download/250165/975693/file/TSL1402R_Datasheet_EN_v1.pdf
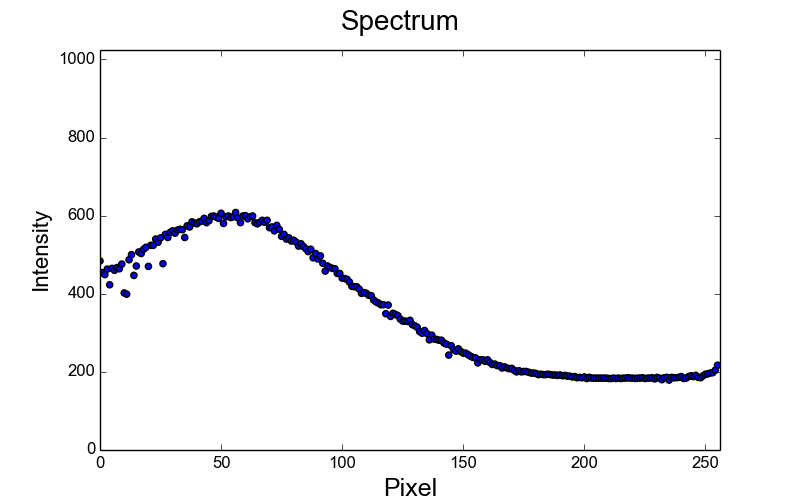
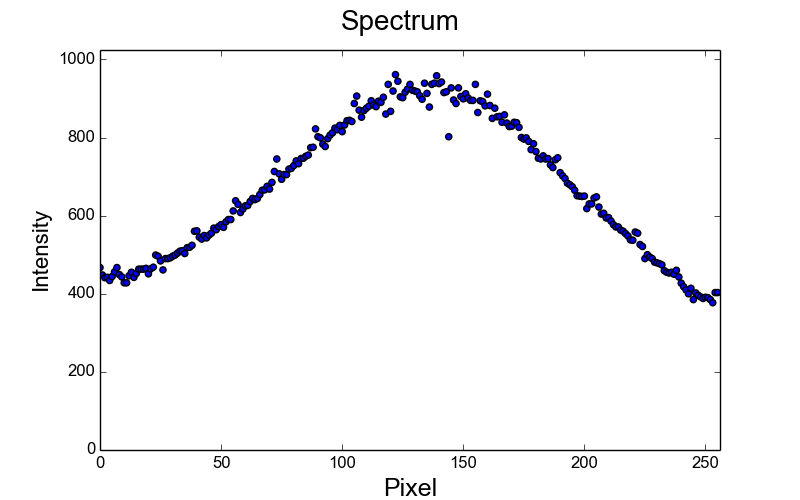
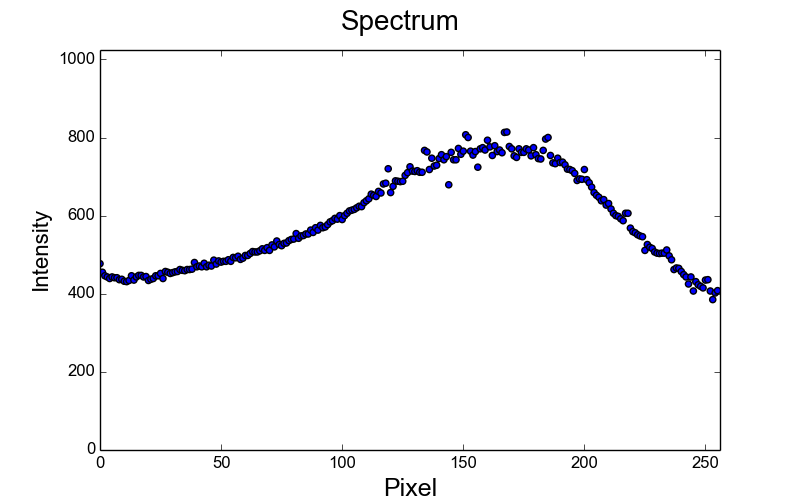
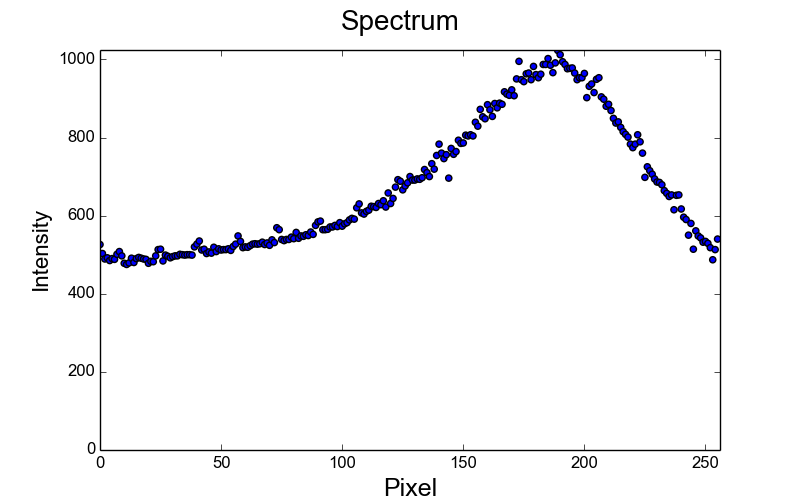
Results
Here are some results for comparison. The images are not calibrated to wavelength (yet).
Light sources
 result white LED |
 result red LED |
 result blue LED |
 result neon lamp |
Reflected spectra
 yellow object |
 green object |
 blue object |
Authors
Emma, Franziska, Sven