Recently, I started to set up a Debian Buster based router with IPv6 prefix delegation and two /64 subnets. One subnet is used for desktop clients, the other serves as a demilitarized zone (DMZ) for servers. The Debian router is located behind Fritz.Box home router, which serves as the DSL modem and forwards all external ports to the Debian router. Of course, traditional IPv4 with NAT is also configured. I’m using a dynamic DNS service to access the IPv6 addresses in the DMZ from the Internet. It took me quite some time to figure everything out, therefore I want to share my findings. Of course, this requires that your ISP provides you with more than just one /64 subnet. My ISP provides a /56.
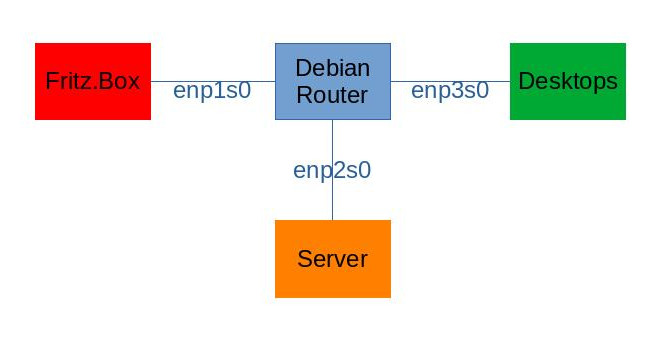
The following diagram illustrates the setup, including interface names on the router:

Regarding IPv4, enp1s0 has the address 192.168.0.2/24, enp2s0 has 192.168.1.1/24 and enp3s0 has 192.168.2.1/24.
First, I had to enable prefix delegation in my Fritz.Box. Coming from the IPv4 NAT world this was something new.
Now with prefix delegation enabled in the Fritz.Box, the Debian router needs to set these prefixes to its DMZ and client network interfaces (enp2s0, enp3s0). This can be achieved with the WIDE DHCPv6 client. (https://superuser.com/questions/742792/how-do-i-deploy-ipv6-within-a-lan-using-a-debian-based-router-and-prefix-delegat was very helpful for me.)
On the router, install it (and all other required packages) with
sudo apt install wide-dhcpv6-client dnsmasq iptables-persistentThen edit
/etc/wide-dhcpv6/dhcp6c.confand set its content to
profile default
{
  information-only;
  request domain-name-servers;
  request domain-name;
  script "/etc/wide-dhcpv6/dhcp6c-script";
};

interface enp1s0 {
    send rapid-commit;
    send ia-na 0;
    send ia-pd 0;
};

id-assoc na 0 {
};

id-assoc pd 0 {
    prefix ::/60 infinity;
    prefix-interface enp2s0 {
        sla-len 4;
        sla-id 0;
        ifid 1;
    };
    prefix-interface enp3s0 {
        sla-len 4;
        sla-id 1;
        ifid 1;
    };
};
Also configure the /etc/network/interfaces like this:
source /etc/network/interfaces.d/*

auto lo
iface lo inet loopback

allow-hotplug enp1s0
iface enp1s0 inet dhcp
iface enp1s0 inet6 auto
    # Important to accept delegated prefixes
    post-up sysctl -w net.ipv6.conf.enp1s0.accept_ra=2

allow-hotplug enp2s0
iface enp2s0 inet static
    address 192.168.1.1
    network 192.168.1.0
    netmask 255.255.255.0

allow-hotplug enp3s0
iface enp3s0 inet static
     address 192.168.2.1
     network 192.168.2.0
     netmask 255.255.255.0
Now when connecting enp1s0, the delegated prefixes will automatically be set to the internal facing interfaces. The internal interfaces will receive the addresses $PREFIX::1.
Next, I’m using Dnsmasq on the internal interfaces to provide DNS and IPv6 router advertisements. Add the following lines to the /etc/dnsmasq.conf
# IPv4
dhcp-range=192.168.1.50,192.168.1.150,12h
dhcp-range=192.168.2.50,192.168.2.150,12h
# IPv6
enable-ra
dhcp-range = ::1,constructor:enp2s0,   ra-stateless, ra-names, 4h
dhcp-range = ::1,constructor:enp3s0,   ra-stateless, ra-names, 4h
To manage inbound and outbound traffic between the different network segments. As is common, the green zone only allows outbound traffic, while the DMZ allows inbound traffic to specified hosts. The following configuration demonstrates how to allow inbound IPv6 traffic to specific hosts. The rule can be extended to specific ports as well. To restore Iptables during boot, I’m using the iptables-persistent package. My /etc/iptables/rules.v4 and /etc/iptables/rules.v6 contain the following lines:
# /etc/iptables/rules.v4
*filter
:INPUT DROP [0:0]
:FORWARD DROP [0:0]
:OUTPUT ACCEPT [81:8253]
-A INPUT -m state --state RELATED,ESTABLISHED -j ACCEPT
-A INPUT -i enp2s0 -j ACCEPT
-A INPUT -i enp3s0 -j ACCEPT
-A INPUT -i lo -j ACCEPT
-A FORWARD -i enp2s0 -j ACCEPT
-A FORWARD -i enp3s0 -j ACCEPT
-A FORWARD -m state --state RELATED,ESTABLISHED -j ACCEPT
COMMIT
*nat
:PREROUTING ACCEPT [44:2803]
:INPUT ACCEPT [23:1484]
:POSTROUTING ACCEPT [0:0]
:OUTPUT ACCEPT [24:1535]
-A POSTROUTING -o enp1s0 -j MASQUERADE
COMMIT
# /etc/iptables/rules.v6
*filter
:INPUT DROP [0:0]
:FORWARD DROP [0:0]
:OUTPUT ACCEPT [175:15496]
-A INPUT -p ipv6-icmp -j ACCEPT
-A INPUT -s fe80::/10 -j ACCEPT
-A INPUT -m state --state RELATED,ESTABLISHED -j ACCEPT
-A INPUT -i enp2s0 -j ACCEPT
-A INPUT -i enp3s0 -j ACCEPT
-A INPUT -i lo -j ACCEPT
-A FORWARD -i enp2s0 -j ACCEPT
-A FORWARD -i enp3s0 -j ACCEPT
-A FORWARD -m state --state RELATED,ESTABLISHED -j ACCEPT
-A FORWARD -d ::2/::ffff:ffff:ffff:ffff -o enp2s0 -p tcp -j ACCEPT
COMMIT
Notice the rule -A FORWARD -d ::2/::ffff:ffff:ffff:ffff -o enp2s0 -p tcp -j ACCEPT. This allows accessing the host in the DMZ from the internet. Now we need to take care that the server in the DMZ always gets the $PREFIX::3 address. This can be done by setting a token with ip. To do this every time the interface is being activated, for example on boot, add the following lines to the /etc/network/interfaces configuration of the server in the DMZ:
iface enp0s31f6 inet6 auto
    pre-up /sbin/ip token set ::2 dev enp0s31f6
To publish the IPv6 address of the server on freedns.afraid.org, I’m using the following crontab line (replace $TOKEN with your private token):
* * * * * (IP=$(ip -6 a list dev enp0s31f6 | grep global | awk '{print $2}' | sed 's/\/64//') && wget --no-check-certificate -O - "https://freedns.afraid.org/dynamic/update.php?$TOKEN&address=$IP" >> /tmp/freedns_$HOSTNAME.log 2>&1)
I hope I did not forget any important part. Feel free to ping me if your setup according to this post does not work.
Update 2024: some information about nft suffix matches can be found on https://github.com/opnsense/core/issues/2544#issuecomment-769811809
